Mastering the art of deboning and skinning chicken thighs can elevate your cooking to new heights. By learning this valuable culinary skill, you can create restaurant-quality dishes at home while saving money by purchasing whole chicken thighs instead of pre-deboned options.
Deboned thighs cook more evenly and absorb flavor better, making them perfect for various cooking methods, from grilling to braising. Understanding the anatomy of a chicken thigh will help you confidently navigate the deboning process, ensuring you get the most meat while avoiding waste.
By following this comprehensive guide, you’ll be able to debone and skin chicken thighs with ease, unlocking a world of culinary possibilities and enhancing your overall cooking experience.
The Benefits of Deboning Chicken Thighs
When you debone chicken thighs, you open up a world of culinary possibilities. Deboning allows you to create dishes that are not only more flavorful but also more versatile in terms of cooking methods and recipes.
Why Chicken Thighs Are Worth the Extra Effort
Chicken thighs are dark meat, making them extra flavorful and tender. The extra effort to debone them is worth it because they absorb marinades and seasonings more effectively than bone-in cuts.
Flavor and Versatility Benefits
Deboned chicken thighs offer several benefits, including:
- Enhanced flavor absorption due to the absence of bones, resulting in more flavorful dishes.
- Uniform thickness ensures even cooking, perfect for various recipes.
- Versatility in cooking methods and dishes, from stir-fries to stuffed rolls.
Using deboned chicken thighs or thighs in your cooking can elevate your meals. The natural richness of thigh meat pairs well with bold flavors.
Essential Tools for Deboning Chicken Thighs

Having the essential tools on hand is crucial for deboning chicken thighs successfully. The right equipment not only makes the process easier but also ensures safety and efficiency in the kitchen.
Knife Selection and Preparation
A sharp, thin-bladed knife is ideal for deboning chicken thighs. You’ll want a knife that can navigate the contours of the bone without tearing the surrounding meat. Keeping your knife sharp and ready is the first step in successful deboning.
Additional Helpful Equipment
Beyond a good knife, several other tools can aid in the deboning process.
- Kitchen shears or poultry scissors are invaluable for snipping through tough cartilage and joints.
- A pair of tweezers or small pliers can help remove small bone fragments.
- Having a small bowl nearby for discarded bones and skin keeps your workspace organized.
- Paper towels are essential for patting the chicken dry and wiping down surfaces.
- Disposable gloves provide protection and make cleanup easier when handling raw chicken.
- A cast iron pan or other heavy-duty cookware will be useful later for cooking your perfectly deboned thighs.
Preparing Your Chicken Thighs for Deboning

Before you start deboning your chicken thighs, it’s crucial to prepare them properly. This step ensures that the deboning process is smooth and efficient.
Proper Thawing Techniques
If your chicken thighs are frozen, it’s essential to thaw them completely before deboning. You can thaw them in the refrigerator overnight or use a cold water thawing method. Once thawed, pat the chicken thighs dry with a paper towel to remove excess moisture. This step helps improve your grip on the chicken and makes the skin easier to remove.
Setting Up Your Workspace
A well-organized workspace is vital for efficient deboning. Start by creating a dedicated area with a large, stable cutting board that won’t slip during the process. Sanitize all surfaces before and after handling raw chicken to prevent cross-contamination. Arrange your tools within easy reach, and keep separate bowls for discarded bones and deboned meat. Having a damp cloth or paper towels nearby can be helpful for quick hand wiping during the process.
| Preparation Step | Purpose |
|---|---|
| Pat chicken thighs dry with paper towels | Improves grip and makes skin removal easier |
| Sanitize workspace | Prevents cross-contamination |
| Arrange tools within easy reach | Enhances efficiency during deboning |
Step-by-Step Guide to Deboning Chicken Thighs

Deboning chicken thighs can seem intimidating, but with the right guidance, you’ll master it in no time. The process involves understanding the bone structure, making precise cuts, and carefully removing the bone.
Identifying the Bone Structure
Before you start deboning, it’s essential to understand the bone structure of a chicken thigh. The thigh bone is a single, long bone with a ball-and-socket joint at one end. Familiarizing yourself with this anatomy will help you navigate the deboning process more effectively.
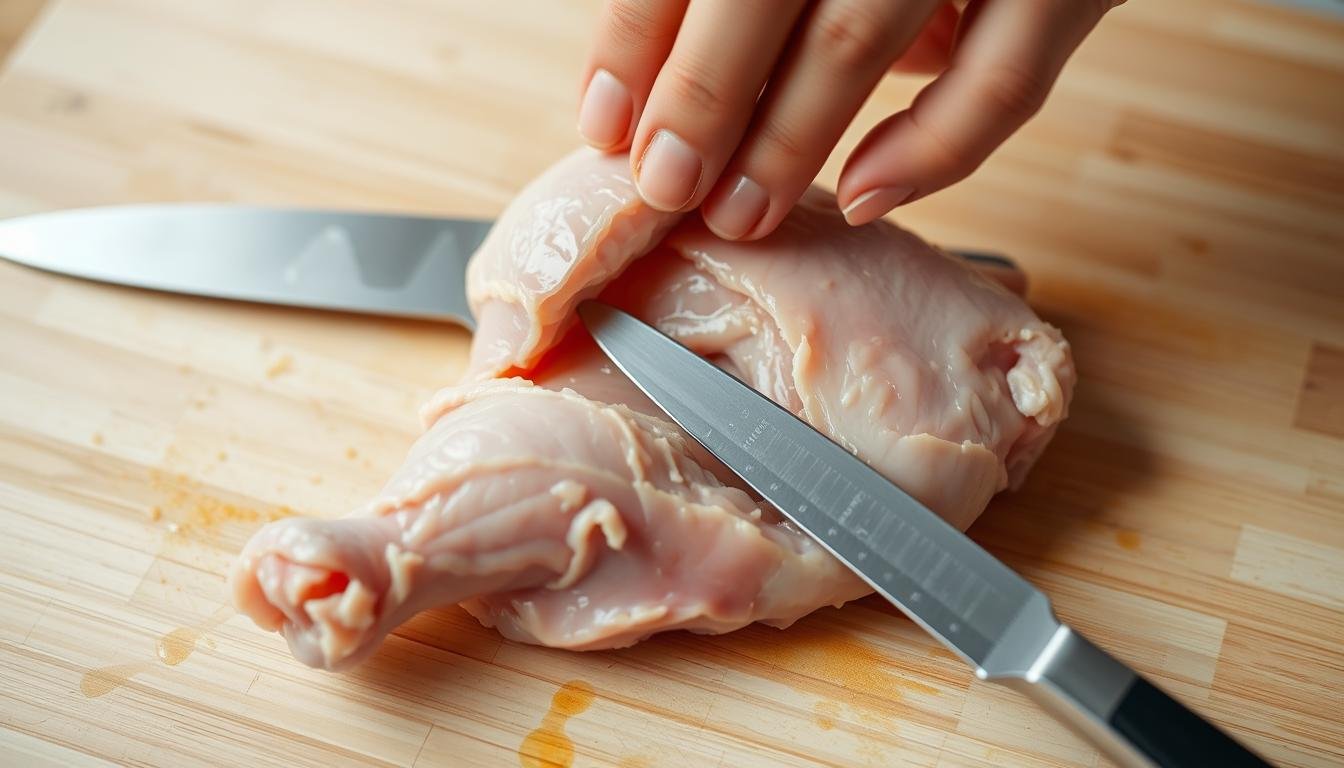
Making the Initial Cuts
To begin deboning, you’ll need to make initial cuts along both sides of the bone. Use a sharp knife to carefully cut through the meat, following the bone’s contours. As you cut, you’ll start to expose the bone. The key is to be gentle and precise to avoid cutting into the bone itself.
- Once you’ve cut along both sides of the bone, work your knife under one end of the bone to begin lifting it away from the meat.
- When you reach the joint, use the tip of your knife to carefully cut through the cartilage and tendons connecting the bone to the meat.
Removing the Bone Completely
As you continue to lift the bone, you’ll need to free it from the surrounding meat. If you encounter resistance, don’t force the knife—reposition and try a different angle to avoid cutting into the meat. After separating the joint, continue lifting the bone while using your knife to free any remaining attached meat.
- Check the deboned thigh for any small bone fragments or cartilage pieces that may remain and remove them.
- Gently flatten the deboned thigh with your hand to create an even thickness, which will help it cook more uniformly.
The entire deboning process typically takes 3-5 minutes per thigh once you’ve developed the skill. With practice, you’ll become more efficient and confident in deboning your chicken thighs.
How to Properly Remove the Skin from Chicken Thighs
Chicken thighs can be made even more versatile by removing their skin, a task that’s easier than you think. Removing the skin allows for more even cooking and can make the chicken more receptive to marinades and seasonings. Whether you’re looking to create a crispy exterior or simply prefer your chicken without skin, the process is straightforward.
When to Keep the Skin On vs. Remove It
Deciding whether to keep the skin on or remove it depends on your cooking method and personal preference. Keeping the skin on can help retain moisture and add flavor, especially when roasting or grilling. On the other hand, removing the skin can make the chicken more suitable for dishes where you want to coat the chicken in sauces or breadcrumbs. Ultimately, the choice depends on the recipe you’re using and your taste preferences.
Technique for Clean Skin Removal
To remove the skin from chicken thighs effectively, start by patting the chicken dry with a paper towel to improve your grip. Here’s a step-by-step guide:
- Begin at the thicker end of the thigh and gently pull the skin back, using your knife to separate it from the meat where necessary.
- Work slowly and use short, careful cuts to avoid removing meat along with the skin.
- If the skin tears, continue from the edge of the tear, working in the same direction.
- Use your fingers to check for any remaining skin or fat pockets that need to be removed.
After removing the skin, inspect both sides of the thigh for any remaining fragments or fat deposits. You can save the removed skin for rendering into schmaltz, adding flavor to future dishes.
Cooking with Deboned Chicken Thighs
Deboned chicken thighs offer a world of culinary possibilities, from Mediterranean-inspired dishes to spicy Asian-style recipes. You can now explore various cooking methods and flavor combinations to create a delicious meal.
Best Cooking Methods
You can cook deboned chicken thighs using several methods, including pan-searing, baking in the oven, or grilling. For a crispy exterior and juicy interior, heat some olive oil in a pan over medium-high heat, then cook the thighs for a few minutes on each side. Alternatively, baking in the oven at a moderate temperature can result in tender and evenly cooked chicken.
| Cooking Method | Cooking Time | Tips |
|---|---|---|
| Pan-Searing | 5-7 minutes per side | Use medium-high heat and olive oil for a crispy exterior. |
| Oven Baking | 20-25 minutes | Bake at 375°F (190°C) for tender and evenly cooked chicken. |
| Grilling | 5-7 minutes per side | Grill over medium heat, turning occasionally, for a smoky flavor. |
Seasoning and Flavor Combinations
To add flavor to your deboned chicken thighs, you can use a variety of seasoning combinations. For a Mediterranean twist, marinate the chicken in a mix of olive oil, garlic, lemon zest, and herbs like thyme and oregano. For an Asian-inspired dish, combine soy sauce, ginger, and sesame oil for a marinade. You can also create a dry rub using paprika, garlic powder, and onion powder.
Conclusion
Deboning and skinning chicken thighs opens up a world of culinary possibilities. With your newfound skills, you can create a variety of dishes, from quick weeknight meals to impressive dinner party recipes. Remember to store deboned chicken in an airtight container in the refrigerator for up to 3 days or freeze for up to 3 months. Always ensure chicken reaches an internal temperature of 165°F for food safety.
FAQ
How long can I store deboned chicken thighs in the fridge?
You can store deboned chicken thighs in an airtight container in the fridge for up to 2 days. Make sure to keep them at a consistent refrigerator temperature below 40°F (4°C).
Can I debone frozen chicken thighs?
It’s recommended to thaw your chicken thighs completely before deboning. Deboning frozen chicken can be challenging and may lead to uneven cuts or torn meat.
What’s the best way to season deboned chicken thighs?
You can season deboned chicken thighs with a mixture of salt, pepper, and your favorite herbs and spices. Consider using paprika, garlic, or olive oil to add flavor. You can also marinate them for added taste.
How do I prevent deboned chicken thighs from becoming dry?
To keep deboned chicken thighs moist, avoid overcooking them. Cook to an internal temperature of 165°F (74°C), and consider using a meat thermometer to ensure accuracy. You can also try cooking methods like pan-searing or baking with olive oil.
Can I use deboned chicken thighs for salads?
Deboned chicken thighs are perfect for salads. Simply slice or chop them into bite-sized pieces and combine with your favorite greens, vegetables, and dressings. You can also add them to a bed of green beans for a healthy meal.
How do I reheat cooked deboned chicken thighs?
To reheat cooked deboned chicken thighs, place them in a pan with a small amount of olive oil over medium heat. Heat until warmed through, or reheat in the oven at 350°F (175°C) for a few minutes.