Imagine sinking your teeth into a warm, fluffy homemade roll straight from the oven. With our quick yeast rolls recipe, you can make this a reality in under an hour. Perfect for busy weeknights or last-minute additions to holiday meals, these delicious rolls are sure to impress.
The secret to our quick dinner rolls lies in the science behind rapid-rise yeast, allowing you to create freshly baked rolls in a fraction of the traditional time. Our 7 simple steps will guide you through the process, ensuring you achieve perfect results every time.
Table of Contents
Key Takeaways
- Make delicious, fluffy yeast rolls in under an hour with our foolproof recipe.
- Perfect for busy weeknights or last-minute holiday meal additions.
- Understand the science behind rapid-rise yeast for homemade rolls.
- Follow our 7 simple steps for freshly baked rolls every time.
- Enjoy great flavor and texture despite the shortened preparation time.
The Magic of Homemade Quick Yeast Rolls
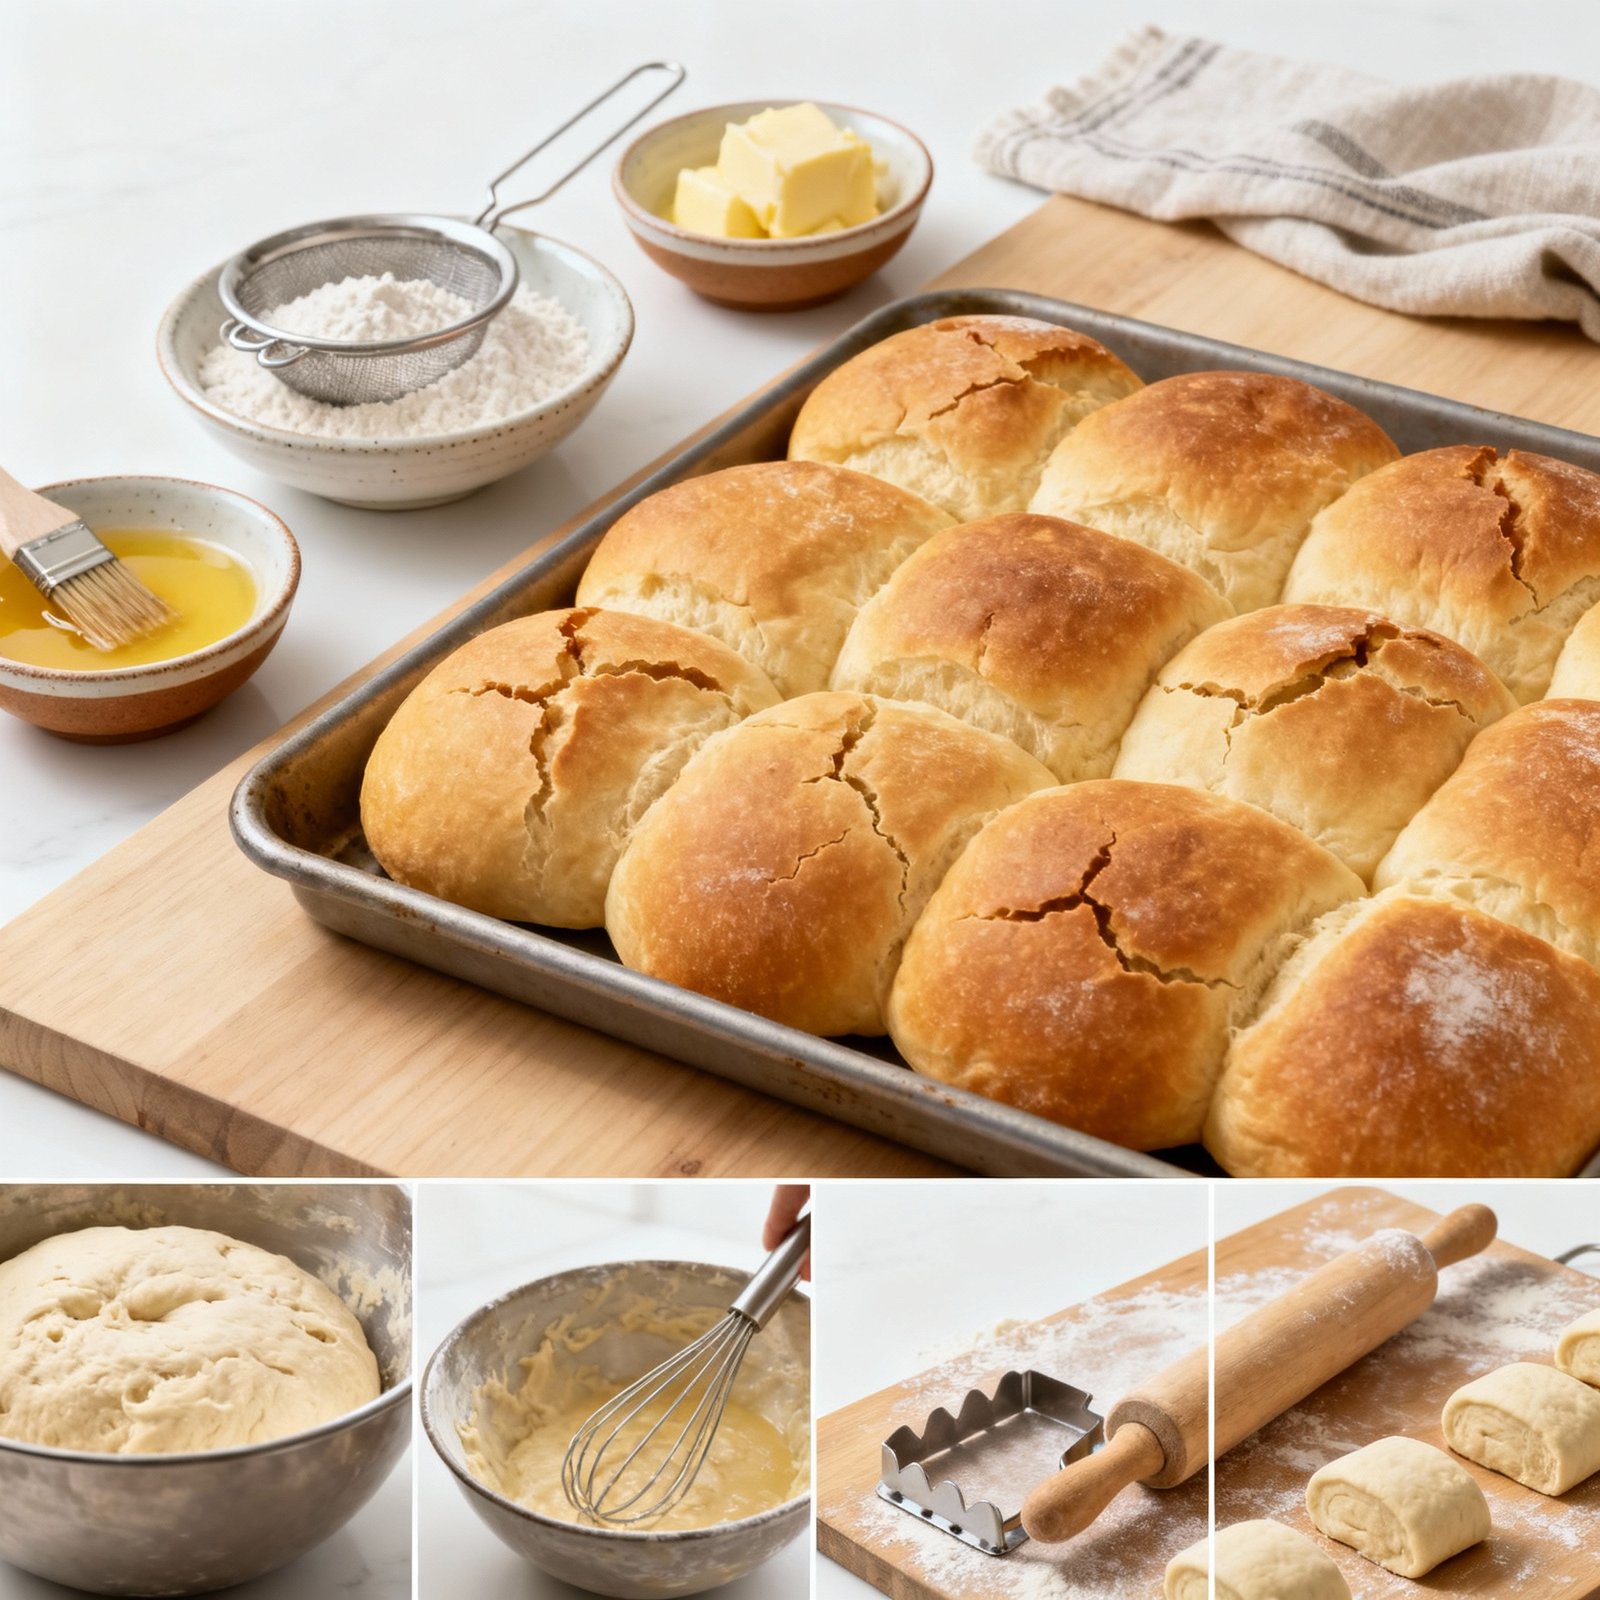
Homemade quick yeast rolls are a game-changer for home bakers looking to save time without sacrificing flavor. With this simple recipe, you can have freshly baked dinner rolls on your table in under an hour. The convenience of having warm, soft homemade rolls any night of the week is a significant advantage. This recipe makes exactly a dozen dinner size rolls, perfect for a family meal.
Why Quick Yeast Rolls Are a Game-Changer
Quick yeast rolls revolutionize home baking by reducing preparation time from hours to just 30-60 minutes. The science behind rapid-rise techniques allows the dough to develop flavor quickly, ensuring that the rolls are not only fast but also delicious. This method makes it possible to enjoy freshly baked rolls on any dinner occasion, not just special ones.
What Makes These Rolls Different
These quick rolls differ from traditional yeast rolls in terms of preparation method, using rapid-rise techniques to save time. Despite the faster preparation, they maintain the same delicious taste and texture as their traditional counterparts. The result is a perfectly baked roll that’s sure to complement any meal with minimal planning required.
Essential Ingredients for Perfect Quick Yeast Rolls
Creating light and fluffy quick yeast rolls starts with selecting the right ingredients. The quality and type of ingredients used can significantly impact the final product’s texture and flavor.
Flour Options and Substitutions
The recipe calls for bread flour, but all-purpose flour is a suitable substitute. Bread flour has a higher protein content, which can result in a chewier texture, while all-purpose flour provides a more balanced texture. Whole wheat flour can also be used for a nuttier flavor and denser texture.
The Right Yeast for Speed
This recipe uses dry active yeast, which needs to be proofed in water. However, instant yeast (also known as rapid-rise or bread machine yeast) can be used as a substitute, eliminating the need for proofing. Using the right type of yeast is crucial for achieving the quick rise that characterizes these rolls.
Supporting Ingredients for Flavor and Texture
Other essential ingredients include sugar, which feeds the yeast; salt, for flavor control; butter, for richness; and eggs, which contribute to structure and color. The temperature of these ingredients, particularly liquids, is critical for activating the yeast properly without killing it.
| Ingredient | Purpose | Notes |
|---|---|---|
| Flour | Structure | Bread flour or all-purpose flour |
| Yeast | Rising | Dry active or instant yeast |
| Sugar | Feeds yeast | Granulated sugar |
| Salt | Flavor control | Use as needed |
| Butter/Egg | Richness/Structure | Enhances flavor and texture |

Kitchen Tools You’ll Need
Preparing quick yeast rolls requires some basic yet crucial kitchen tools. To start, you’ll need a few essential items to ensure your rolls turn out light and fluffy.
Must-Have Equipment
For making quick yeast rolls, a stand mixer equipped with a dough hook attachment is highly recommended as it simplifies the kneading process. However, if you don’t have one, you can also mix the dough by hand. A large mixing bowl is necessary for combining ingredients, and accurate measuring cups are crucial for the recipe’s success. You’ll also need a baking sheet or baking dish for baking the rolls to perfection.
Optional Tools That Help
While not mandatory, some tools can make the process easier. An instant-read thermometer ensures your liquids are at the right temperature, and a dough scraper can be handy for handling the dough. Using parchment paper on your baking sheet can prevent the rolls from sticking and make cleanup easier.
| Tool | Purpose |
|---|---|
| Stand Mixer with Dough Hook | Kneading the dough efficiently |
| Mixing Bowl | Combining ingredients |
| Baking Sheet or Baking Dish | Baking the rolls |
| Instant-read Thermometer | Checking liquid temperature |
| Dough Scraper | Handling the dough |
Step 1: Activating the Yeast Properly
The foundation of perfect quick yeast rolls lies in properly activating the yeast. Activating yeast is a simple yet crucial step that sets the stage for the entire recipe.
To activate the yeast, you need to mix it with sugar, oil, and warm water. Let this mixture rest for 15 minutes.
Getting the Temperature Right
To activate yeast, the temperature of the water must be between 105-110°F. This temperature range is critical because it’s warm enough to encourage yeast activity without being so hot that it kills the yeast cells.
Signs Your Yeast is Active
After mixing yeast with sugar, oil, and warm water, let it rest for 15 minutes. Active yeast will display signs such as bubbling, foaming, and a distinct yeasty aroma. These visual cues indicate that your yeast is ready to help your dough rise.
| Signs of Active Yeast | Description |
|---|---|
| Bubbling | Visible bubbles on the surface |
| Foaming | A layer of foam on top of the mixture |
| Yeasty Aroma | A distinct smell similar to beer or bread |

Step 2: Mixing and Kneading the Perfect Dough
To achieve fluffy perfection, it’s essential to master the mixing and kneading process. This step is crucial in developing the gluten structure that gives your quick yeast rolls their characteristic texture.
Hand Mixing vs. Stand Mixer Method
When it comes to mixing and kneading, you have two primary options: using a stand mixer with a dough hook attachment or doing it by hand. The stand mixer method is quicker, typically taking 5-7 minutes to achieve a smooth dough, whereas hand kneading can take around 10 minutes. To mix using a stand mixer, combine the yeast mixture, salt, egg, and flour in the mixer’s bowl. Knead with the hook attachment until the dough is soft and smooth.
How to Know When Your Dough is Ready
A well-kneaded dough should be smooth, slightly tacky but not sticky, and elastic when stretched. If the dough seems too wet, add a little flour at a time. Conversely, if it’s too dry, add small amounts of water. The right consistency is key to a successful recipe for quick yeast rolls.
Step 3: Shaping Your Rolls for Even Baking
Shaping your yeast rolls is a crucial step that affects both their appearance and baking consistency. To achieve the best results, you need to divide your dough into even portions and shape them into smooth balls.
Dividing the Dough Evenly
To divide your dough evenly, aim for 12 equal pieces for standard dinner rolls. This ensures consistent baking and a uniform size. You can achieve this by cutting your dough into equal parts using a dough scraper or a sharp knife.
Roll-Shaping Techniques
To shape each portion into a smooth ball, pull the edges toward the center and pinch to seal. This technique helps create a tight surface that will expand evenly during rising and baking. Place the shaped rolls in a 9 x 13 pan or baking dish sprayed with cooking spray, leaving enough space between them for expansion.
| Shaping Technique | Description | Result |
|---|---|---|
| Simple Ball | Pull edges to center, pinch to seal | Smooth, even rolls |
| Knots | Twist dough into a knot | Unique, rustic appearance |
| Crescents | Roll out, shape into crescents | Elegant, curved rolls |

Step 4: The Quick Rise Secret
The secret to quick yeast rolls lies in creating the ideal rising environment. To achieve this, you need to provide the right conditions for the dough to rise rapidly without compromising its texture or flavor.
Creating the Ideal Rising Environment
Cover the rolls with plastic wrap or a clean kitchen towel to prevent them from drying out. Let them rise in a warm spot for 10-20 minutes. You can create a warm environment by slightly preheating your oven and then turning it off.
Visual Cues for Perfectly Risen Dough
After ten minutes, check your rolls. They should have puffed up slightly. If they don’t look puffy, that’s okay. The key is to look for a slight increase in size, indicating that the dough is rising properly.
| Rising Time (Minutes) | Visual Cue |
|---|---|
| 10 | Slight puffiness |
| 20 | Approximately doubled in size |
Step 5: Preparing for the Oven
To achieve the perfect golden-brown crust on your quick yeast rolls, proper oven preparation is essential. This involves more than just turning on the heat; it’s about creating an ideal baking environment.
Preheating and Rack Positioning
Preheating your oven to the correct temperature is crucial. For quick yeast rolls, preheat your oven to 400 degrees F. Additionally, ensure your oven rack is positioned in the center to facilitate even heat distribution and consistent browning.
Pre-Bake Treatments for Golden Tops
Before baking, consider applying a pre-bake treatment to enhance the appearance and flavor of your rolls. An egg wash can add shine, while a brush of butter can enrich the flavor. Alternatively, a light brushing with milk can promote browning.
Properly preparing your baking surface is also vital. Grease your baking pan or use parchment paper to prevent your rolls from sticking. Understanding how different baking vessels (such as glass versus metal pans) affect baking temperature and time adjustments can also help you achieve the best results.
Step 6: Baking Your Quick Yeast Rolls Recipe
Baking is a crucial step in making quick yeast rolls, requiring precision in temperature and timing. To bake your rolls to perfection, you’ll need to balance the oven temperature and baking duration.
Timing and Temperature Guidelines
Bake your quick yeast rolls in a preheated oven at 400 degrees for 10-15 minutes. The ideal baking temperature typically ranges between 350-400°F. It’s crucial to preheat your oven to the correct temperature to ensure even baking.
- Preheat your oven to the specified temperature to ensure a consistent baking environment.
- Monitor your rolls during the baking time, avoiding frequent oven door openings that can cause temperature fluctuations.
How to Check for Doneness
Your rolls are done when they’re golden brown on top and sound hollow when tapped on the bottom. You can also use an instant-read thermometer to check for an internal temperature of about 190°F.
- Check the rolls for the golden brown color, a sign of proper baking.
- Use an instant-read thermometer to verify the internal temperature has reached 190°F.
Step 7: Finishing Touches for Maximum Flavor
After baking, the last step in our quick yeast rolls recipe involves a few clever techniques to enhance flavor and presentation. The key to making your dinner rolls truly special lies in how you finish them.
Butter Brush Technique
Brushing the tops of your freshly baked rolls with melted butter not only enhances their flavor but also keeps the crust tender. To master this technique, ensure the butter is evenly distributed across the hot rolls for maximum absorption.
Serving Warm for Best Results
Serving your dinner rolls warm is crucial for the best taste experience and texture. Consider trying creative finishing touches like herb-infused butter or garlic butter to add flavor variations to your recipe

Troubleshooting Common Issues
Making quick yeast rolls can sometimes be tricky, but with the right troubleshooting techniques, you can achieve perfect results. Despite your best efforts, you might encounter issues like dense or heavy rolls, or dough that refuses to rise.
Fixing Dense or Heavy Rolls
Dense or heavy rolls can result from insufficient rising time, using old yeast, or improper kneading of the dough. To prevent these issues, ensure your yeast is fresh and active, knead the dough sufficiently, and allow adequate time for the dough to rise. Using the right type of flour can also impact the texture of your rolls.
Solutions for Rolls That Won’t Rise
If your dough isn’t rising, check the freshness of your yeast and the temperature of the liquid used in your recipe. Yeast thrives in warm, not hot, conditions. Also, ensure you’re not overworking the dough, as this can prevent proper rising. For dinner rolls, a warm, draft-free environment can help the dough rise properly, leading to a successful batch of rolls.
Delicious Variations to Try
Discover the versatility of quick yeast rolls with sweet and savory adaptations. You can easily customize the basic recipe to suit various tastes and dietary preferences.
Sweet Roll Adaptations
Transform your rolls into sweet treats by adding cinnamon-sugar, orange glaze, or honey-butter topping. These variations make for a delightful breakfast or dessert. You can also experiment with different types of flour, such as whole wheat or gluten-free options, to create a unique flavor profile.
Savory Flavor Additions
For a savory twist, incorporate herbs like rosemary or thyme, or add a sprinkle of cheese for an extra burst of flavor. These dinner rolls are perfect for accompanying your favorite meals. Adjusting the fat content or adding garlic can further enhance the flavor, making your roll a standout at the dinner table.
Storage and Reheating Tips
To enjoy your quick yeast rolls over several days, it’s crucial to store them correctly. Proper storage maintains freshness and texture.
Keeping Rolls Fresh
Store your freshly baked rolls in an airtight container at room temperature. This method keeps rolls fresh for a day or two. Ensure rolls are completely cool before storing to prevent sogginess from trapped steam. For longer storage, consider freezing.
Bringing Back That Fresh-Baked Taste
Reheat your rolls to enjoy them as if freshly baked. For best results, warm them in the oven at 300°F for 5-10 minutes. Alternatively, you can use the microwave, but be cautious of uneven heating. Frozen rolls should be thawed at room temperature or reheated directly from frozen, adjusting the heating time accordingly.
| Reheating Method | Time | Temperature |
|---|---|---|
| Oven | 5-10 minutes | 300°F |
| Microwave | 20-30 seconds | N/A |
Conclusion
Perfect for any occasion, our quick yeast rolls can be customized to suit various tastes and dietary needs. By following the seven simple steps, you can create delicious homemade bread that elevates any meal. Our recipe uses instant yeast to save time without sacrificing quality. Feel free to experiment with different ingredients and variations to make the recipe your own. With this easy-to-follow guide, you’ll be baking like a pro in no time, and your freshly baked rolls will be the perfect addition to your dinner table.
FAQ
What is the ideal temperature for rising dough?
The ideal temperature for rising dough is between 75°F to 80°F (24°C to 27°C), which is considered room temperature. This allows the instant yeast to activate and helps the dough rise evenly.
Can I use a stand mixer with a dough hook attachment for kneading?
Yes, using a stand mixer with a dough hook attachment is an efficient way to knead the dough. It saves time and effort, and helps to develop the gluten in the dough.
How long does it take for the dough to rise?
The rising time can vary depending on factors like temperature and yeast activity. Generally, it takes around 1 hour for the dough to double in size. Keep an eye on it, and once it has doubled, it’s ready for the next step.
What is the best way to store leftover dinner rolls?
To keep leftover dinner rolls fresh, store them in an airtight container at room temperature for up to 3 days. You can also freeze them for longer storage. Simply thaw and reheat when needed.
Can I freeze the dough before baking?
Yes, you can freeze the dough after shaping the rolls. Place them on a baking sheet lined with parchment paper, and freeze until solid. Then, transfer the frozen rolls to a freezer-safe bag or container for later use.
How do I achieve a golden brown top on my rolls?
To achieve a golden brown top, brush the rolls with melted butter or an egg wash before baking. This will give them a rich, golden color and a delicious flavor.
What is the recommended baking temperature and time?
Preheat your oven to 375°F (190°C). Bake the rolls for 12-15 minutes, or until they are golden brown. Keep an eye on them to ensure they don’t overcook.