
You’ve felt it before—the frustration of a crumbly, tough pastry that cracks under pressure. Maybe it happened during a holiday gathering or a quiet weekend bake. Whatever the moment, that disappointment sticks. But what if you could transform those kitchen jitters into confidence?
This guide isn’t just about mixing flour and butter. It’s about mastering a timeless skill with a method refined by generations of bakers. Forget store-bought shortcuts. With four simple ingredients and a few tried-and-true techniques, you’ll create a flaky, golden base that elevates every filling.
Why does this Perfect Pie Crust recipe work? It balances precision with flexibility. Cold butter creates air pockets for lift. Minimal water keeps the dough tender. And gentle handling ensures edges stay intact. Whether you’re a novice or a seasoned cook, these steps remove guesswork—so you focus on the joy of baking.
Table of Contents
Key Takeaways
- Requires only four basic ingredients for consistent results
- Cold butter and water are critical for ideal texture
- Hand-mixing preserves flakiness better than machines
- Saves time compared to complicated recipes
- Outperforms pre-made options in flavor and structure
- Works for sweet and savory fillings alike
Ingredients and Essential Tools
Choosing the right elements transforms baking from guesswork to precision. Let’s break down what truly matters in your kitchen setup.

Building Blocks of Flaky Pastry
High-protein flour forms the foundation. It creates structure while allowing layers to separate. Unsalted butter adds richness, while shortening boosts tenderness. Ice water binds everything without activating gluten.
Measurements matter. Too much water makes dough sticky. Too little causes cracks. A 1/4 teaspoon of salt per cup of flour enhances flavor without overpowering fillings.
Your Toolkit for Success
Three tools make mixing easier:
- Pastry blender: Cuts fats into flour evenly
- Glass mixing bowl: Stays colder than metal
- Digital scale: Ensures accurate ratios
Keep a ruler nearby. Rolling dough to 1/8-inch thickness prevents uneven baking. A bench scraper helps lift and rotate the pastry without tearing.
| Ingredient | Function | Pro Tip |
|---|---|---|
| Butter | Creates steam pockets | Freeze for 15 minutes before use |
| Shortening | Prevents toughness | Use in 1:1 ratio with butter |
| Flour | Forms structure | Sift twice for airiness |
Mastering the Perfect Pie Crust Techniques
Ever wonder why some pastry flakes while others crumble? The answer lies in temperature control. Keeping ingredients cold isn’t a suggestion—it’s the golden rule for achieving layers that shatter delicately with each bite.
Choosing Cold Fats and Maintaining Temperature
Cold butter and shortening act like tiny insulation pockets in your dough. When chilled fats hit the oven, they melt slowly, creating space for steam to lift layers. Warm fats blend too thoroughly with flour, resulting in a dense texture.
Work quickly to prevent heat transfer from your hands. If the mixture feels sticky, return it to the refrigerator for 10 minutes. Pro bakers often chill their tools too—even the mixing bowl.

The Role of Ice Water in Achieving Flakiness
Ice water does two jobs: it binds dry ingredients and delays gluten formation. Add it gradually—1 tablespoon at a time—until the dough just holds together. Overhydration activates wheat proteins, leading to toughness.
Steam from the water pushes apart fat layers during baking. This creates the signature flaky texture. Use a spray bottle for precise moisture control if your kitchen is humid.
| Factor | Cold Water | Ice Water | Impact |
|---|---|---|---|
| Temperature | 40-50°F | 32°F | Slows gluten development |
| Mixing Time | 2-3 minutes | 1-2 minutes | Reduces hand contact |
| Gluten Activation | Moderate | Minimal | Affects tenderness |
| Steam Production | Average | Maximum | Enhances layer separation |
Timing matters more than you think. Mix dough until it resembles coarse crumbs—about 45 seconds. Let it rest in the fridge for 30 minutes before rolling. This relaxes gluten strands and re-chills fats for optimal results.
Step-by-Step Pie Dough Preparation
Creating exceptional pastry starts with precise execution. Each step builds the foundation for tender layers and sturdy edges. Let’s transform basic components into a workable base for your favorite fillings.

Mixing Dry Ingredients and Cutting in the Fats
Combine 2½ cups of flour with 1 teaspoon of salt in a chilled bowl. Use a whisk to distribute the salt evenly. Add ¾ cup of cold butter and ¼ cup of shortening, cut into small cubes.
Work quickly with a pastry blender. Break fats into pea-sized pieces coated in flour. Stop when the mixture resembles coarse sand with visible lumps. This creates pockets for steam during baking.
| Mixing Method | Texture Result | Time Required |
|---|---|---|
| Hand-Cutting | Flaky layers | 90 seconds |
| Food Processor | Dense crumbs | 8 pulses |
Gradual Addition of Ice Water to Form the Dough
Start with 4 tablespoons of ice water. Drizzle it over the flour mixture while tossing with a fork. Add 1 more tablespoon at a time until clumps form. The dough should hold together when pressed—not sticky or crumbly.
Gather it into two equal balls. Wrap tightly in plastic and refrigerate for 30 minutes. This rest period relaxes gluten and rechills fats, making rolling easier.
Critical reminders: Never knead the mixture like bread dough. Handle it just enough to combine. Warm butter melts into flour, creating a tough result instead of delicate flakes.
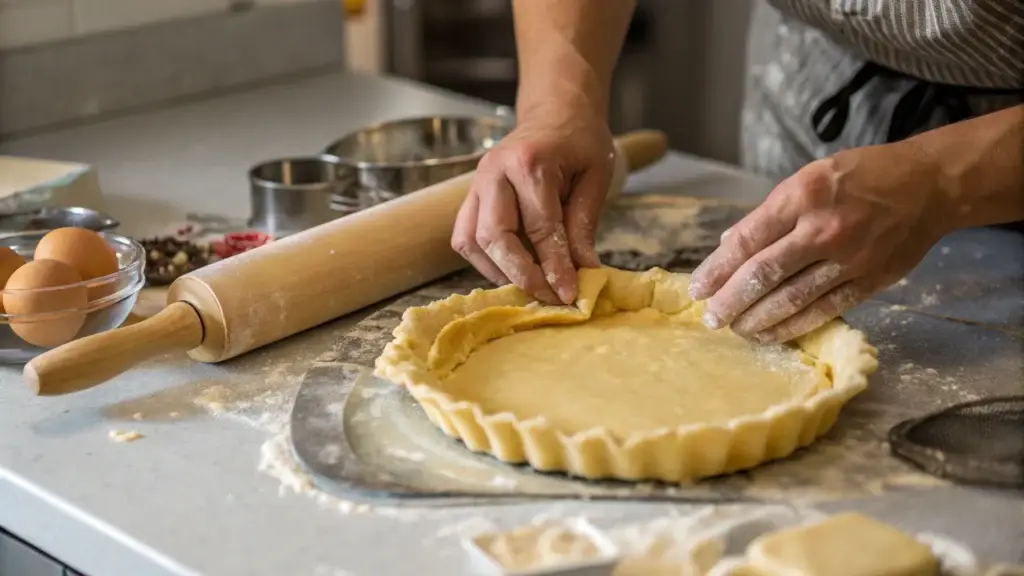
Rolling, Shaping, and Transferring Your Dough
The moment your rolling pin meets chilled dough determines your pastry’s final texture. Proper technique preserves those delicate layers you worked so hard to create. Let’s transform this often-frustrating step into a smooth, controlled process.

Rolling Techniques for an Even Base
Start with a lightly floured surface. Remove chilled dough from the refrigerator and let it soften slightly—about 3 minutes. Begin rolling from the center outward, rotating the pastry 45 degrees after each pass. This prevents uneven thickness and maintains a circular shape.
If the dough sticks, dust with minimal flour. Slide plastic wrap underneath halfway through rolling. This makes flipping easier without tearing. Aim for 1/8-inch thickness—thinner areas bake faster and risk burning.
Seamless Transfer to the Pie Plate
Fold the rolled dough into quarters using a bench scraper. Lift it onto your pie plate, then unfold gently. Press the pastry into corners without stretching—this prevents shrinkage during baking.
For stubborn transfers, try the parchment paper method. Roll dough directly onto floured parchment, then invert it over the plate. Peel away the paper slowly while guiding the edges into place.
Trim excess dough with kitchen shears, leaving a 1-inch overhang. Tuck this under itself to create a thick border for crimping. Chill the shaped crust 15 minutes before adding fillings—cold dough holds decorative patterns better.
Baking Methods: Blind Baking and Par-Baking
The oven door closes, and your creation’s fate rests on precise temperature control. Whether you need a sturdy base for custard fillings or a crisp shell for fruit pies, mastering these techniques ensures structural integrity.
Using Pie Weights and Parchment for Stability
Start by chilling your shaped dough for 20 minutes. This prevents shrinkage during baking. Line the cold base with parchment paper, leaving 2-inch overhangs on all sides.
Fill the parchment-lined shell with ceramic weights or dried beans. Distribute them evenly across the bottom and up the sides. Bake at 375°F for 15 minutes to set the structure.
- Remove weights carefully using parchment handles
- Return empty crust to oven for 5 minutes
- Check for air bubbles – press them down gently
Achieving a Golden and Crisp Foundation
For fillings requiring raw baking, prick the base thoroughly with a fork. This allows steam to escape, preventing soggy layers. Brush edges with egg wash for even browning.
Monitor color changes closely. A pale golden hue indicates par-baking – ideal for juicy fillings. Deep amber signals full blind baking, perfect for chilled desserts.
| Method | Bake Time | Use Case |
|---|---|---|
| Blind Bake | 25-30 mins | Custard pies |
| Par-Bake | 12-15 mins | Fresh fruit fillings |
Invest in quality bakeware. Heavy-gauge metal pans conduct heat better than glass, reducing burnt edges. Let the base cool completely before adding fillings – warm dough turns soggy fast.
Troubleshooting Common Pie Crust Issues
Why does your pastry crumble despite careful preparation? Structural flaws often stem from rushed techniques or ingredient imbalances. Let’s address these frustrations head-on with science-backed solutions.
Solving Structural Challenges
Dry, crumbly dough signals insufficient water or overmixed fats. Add ice water ½ teaspoon at a time until clumps form. For sticky mixtures, dust sparingly with flour—overcorrection creates toughness.
- Shrinkage: Caused by stretched edges during shaping. Always let dough relax in the fridge for 30 minutes before baking
- Tough layers: Overworking activates gluten. Mix until just combined—visible fat chunks are desirable
- Cracked edges: Brush with cold water and press seams gently with your fingertip
If the base tears during rolling, fold it into quarters. Chill in the freezer for 10 minutes to firm fats, then try again. This pause lets gluten relax and prevents overhandling.
| Issue | Quick Fix | Prevention Tip |
|---|---|---|
| Sticky dough | Dust with 1 tsp flour | Chill bowl before mixing |
| Crumbly edges | Spritz with water | Measure water precisely |
| Soggy base | Pre-bake 12 minutes | Use metal pie plate |
Remember: Every mishap teaches texture control. Adjustments become instinctual with practice—your hands will learn when to stop mixing.
Storing and Freezing Your Pie Dough
What happens to your dough when life interrupts your baking plans? Proper storage preserves texture while giving you flexibility. Follow these methods to keep your base ready for any spontaneous pie-making moment.
Refrigeration Best Practices for Tender Dough
Shape chilled dough into 1-inch thick discs before wrapping. This flat form cools evenly and rolls out faster later. Use two layers of plastic wrap, pressing firmly to eliminate air pockets.
Refrigerate for up to 48 hours. Longer storage dries out fats, compromising flakiness. If edges crack during chilling, spritz lightly with ice water before rolling.
Freezing Techniques and Thawing Guidelines
For freezer storage, wrap discs in plastic followed by foil. Label with the date—dough stays usable for 3 months. Avoid stacking multiple layers; they’ll freeze unevenly.
Thaw overnight in the refrigerator. Never use room-temperature defrosting—it creates condensation that activates gluten. Roll while still slightly firm for easier handling.
| Storage Method | Duration | Texture Impact |
|---|---|---|
| Refrigeration | 2 days | Maintains tenderness |
| Freezing | 3 months | Preserves layer structure |
Key reminder: Frozen dough loses elasticity over time. Use within 90 days for best results. If rolling feels difficult after thawing, let it rest 5 minutes at room temperature.
Practical Tips from Expert Bakers
Professional bakers guard their techniques like treasure maps. Their wisdom turns good pastry into memorable creations. Let’s unlock their playbook for flawless results every time.
Maintaining Cold Ingredients and Minimal Handling
Chill your mixing bowl 30 minutes before starting. Freeze butter cubes for 20 minutes—they’ll stay solid longer during mixing. Work near an open refrigerator if possible to maintain cool air flow.
Use your fingertips sparingly. Warm hands melt fats. Toss ingredients with a fork instead of kneading. Stop when dough forms walnut-sized clumps—overmixing creates toughness.
| Temperature Tip | Tool | Benefit |
|---|---|---|
| Freeze flour | Marble slab | Slows heat transfer |
| Ice bath under bowl | Insulated gloves | Protects dough structure |
Secrets to Enhancing Flavor and Texture
Add 1 teaspoon vodka to ice water. Alcohol inhibits gluten without adding liquid. For savory recipes, mix grated Parmesan into flour—it boosts umami and crispness.
Brush edges with heavy cream before baking. Proteins caramelize faster than butter, creating golden crunch. Sprinkle coarse sugar on fruit fillings—it draws out juices slowly.
- Replace 10% flour with cornstarch for tender layers
- Use cultured butter for complex flavors
- Rest dough overnight—enzymes develop sweetness
Experiment with spice blends. Cardamom in apple fillings. Smoked paprika in quiche. Temperature control remains key—chill shaped dough 15 minutes before adding toppings.
Conclusion
Your journey from basic ingredients to a flaky foundation hinges on precise ratios and mindful techniques. Cold butter meets flour, ice water binds the mixture, and careful handling preserves delicate layers. Each decision—measuring flour by weight or resting dough—shapes the final result.
Every step demands attention, from cutting fats to sealing edges. Chilling preserves texture, while gentle rolling maintains those coveted flaky layers. If challenges arise, revisit the method: rushed steps often cause cracks or toughness.
Even experienced bakers refine their approach. A dash of spice or alternative fat can elevate flavor without compromising structure. Remember, practice turns troubleshooting into mastery—each bake hones your intuition.
With this roadmap, you’ll create crusts that support both sweet and savory pies. Proper storage extends readiness for spontaneous baking. Soon, you’ll craft reliable bases that let vibrant fillings shine.