
Welcome to our comprehensive guide on making delicious homemade buns! In this article, we’ll walk you through the easy steps to achieve homely perfection in your baking.
Whether you’re a beginner or an experienced baker, our friendly tone and detailed instructions will help you create perfect buns that will impress your family and friends. With our simple recipe, you’ll be able to make mouth-watering buns that are perfect for any occasion.
Table of Contents
Key Takeaways
- Learn how to make a basic buns recipe with ease
- Discover the secrets to achieving homely perfection in your baking
- Get tips on how to make delicious homemade buns
- Understand the importance of using quality ingredients
- Follow our step-by-step guide to making perfect buns
The Magic of Homemade Buns
There’s something undeniably special about biting into a freshly baked homemade bun. The softness, the flavor, and the aroma all combine to create a culinary experience that’s hard to beat. In this section, we’ll explore what makes homemade buns so special and why they’re often superior to their store-bought counterparts.
Why Homemade Buns Beat Store-Bought Every Time
Homemade buns have several advantages over store-bought ones. For one, they can be made fresh whenever you need them, ensuring optimal taste and texture. Control over ingredients is another significant benefit, allowing you to avoid preservatives and additives commonly found in commercial buns. Moreover, the process of making buns can be a fun and rewarding activity, especially when shared with family or friends.
The love and care that go into making homemade buns result in a product that’s not just delicious but also made with a personal touch. Whether you’re serving them at a dinner party or using them for a weeknight sandwich, homemade buns are sure to impress.
What Makes a Perfect Bun?
A perfect bun is a combination of texture, flavor, and appearance. It should have a soft and airy interior along with a lightly golden crust. The flavor should be subtle, with a hint of yeastiness, and the bun should be soft to the touch but not too dense. Achieving this perfection requires attention to detail, from the quality of ingredients to the proofing and baking processes.
Understanding the characteristics of a perfect bun is key to making consistent, high-quality homemade buns. By focusing on the right ingredients, techniques, and conditions, you can create buns that are not only delicious but also visually appealing.
Essential Ingredients for Your Basic Buns Recipe
Creating the perfect bun starts with understanding the essential ingredients that make up your basic buns recipe. The quality and type of ingredients you choose can significantly impact the final product, from the texture and flavor to the overall appearance of your buns.
Flour Options and Their Effects on Your Buns
The type of flour used is a critical component in bun-making. Different types of flour can affect the texture, structure, and taste of your buns.
All-Purpose vs. Bread Flour
All-purpose flour is a versatile option that works well for most bun recipes, offering a balanced protein content. Bread flour, with its higher protein content, can produce buns with a chewier texture and more complex flavor.
Incorporating Whole Wheat
Incorporating whole wheat flour into your recipe can add depth and nutrition to your buns. Start by substituting a portion of all-purpose flour with whole wheat to find your preferred balance.
Yeast Types: Active Dry vs. Instant
Yeast is a crucial ingredient for making buns rise. Understanding the difference between active dry yeast and instant yeast can help you choose the right type for your recipe.
| Yeast Type | Characteristics | Usage |
|---|---|---|
| Active Dry Yeast | Needs rehydration, more forgiving | Proofing required before use |
| Instant Yeast | Can be mixed directly with dry ingredients, faster action | No proofing required, mix directly into dough |
By understanding the roles of different flours and yeasts, you can make informed decisions to adjust your basic buns recipe to achieve the desired results.
Equipment You’ll Need
To make the bun-making process smoother, it’s essential to have the right tools at your disposal. Having the correct equipment not only simplifies the process but also ensures that your buns turn out perfectly. In this section, we’ll explore the must-have tools and nice-to-have extras that will elevate your bun-making game.
Must-Have Tools
To get started, you’ll need some fundamental baking equipment. Mixing bowls are a necessity for combining ingredients, while measuring cups and spoons ensure accuracy in your measurements. A dough scraper is handy for handling sticky dough, and a baking sheet is required for baking your buns to perfection. Additionally, a wire rack is useful for cooling your buns after they’ve been baked.
Investing in these essential tools will make a significant difference in your baking experience. For instance, using a digital scale instead of measuring cups can improve the accuracy of your ingredient measurements, leading to more consistent results.
Nice-to-Have Extras
While the must-have tools will get you started, there are some nice-to-have extras that can enhance your bun-making process. A dough proofing basket can help create a beautiful shape and texture, while a banneton can add a professional touch to your buns. A stand mixer with a dough hook attachment can also make kneading easier, especially for larger batches.
These extras can take your bun-making to the next level, allowing you to experiment with different techniques and achieve more consistent results.
The Ultimate Basic Buns Recipe
Now that we have all the essential ingredients and equipment, it’s time to dive into the ultimate basic buns recipe. This step-by-step guide will walk you through measuring ingredients accurately, mixing and kneading the dough, letting it rise for the first time, and shaping your buns into perfect treats.
Measuring Ingredients Accurately
Measuring ingredients accurately is crucial for achieving the perfect buns. Use a digital scale for precision, especially when measuring flour and yeast. The ratio of ingredients can significantly affect the final product, so ensure you’re using the correct proportions.
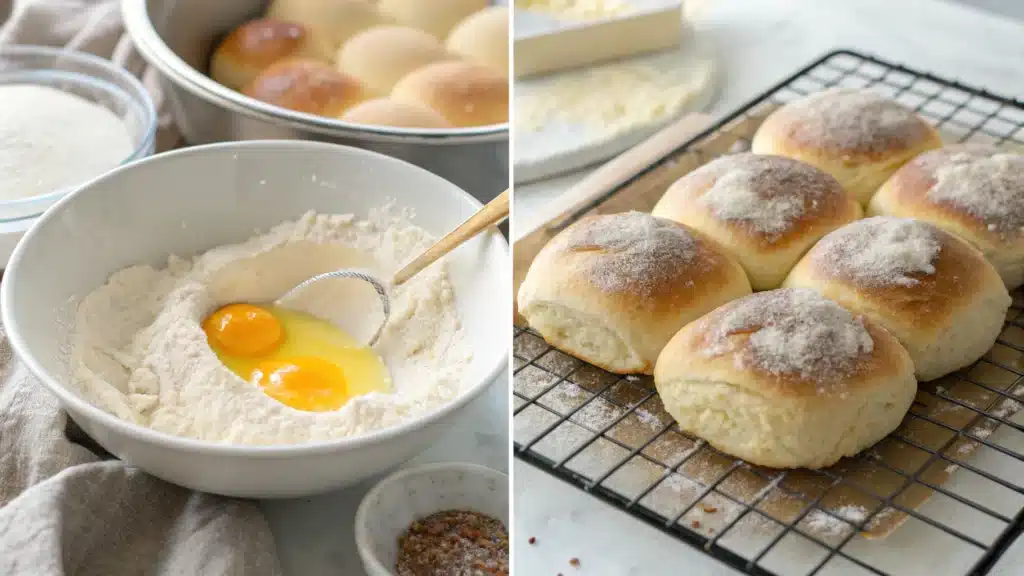
Mixing and Kneading the Dough
Mixing and kneading are critical steps in developing the dough’s gluten, which gives your buns their structure and texture. You can mix the ingredients by hand or using a stand mixer.
Hand Kneading Technique
For hand kneading, start by combining the ingredients in a large bowl until they form a shaggy dough. Then, turn the dough out onto a floured surface and knead for about 10 minutes, until the dough becomes smooth and elastic. Use the heel of your hand to push down on the dough, then fold it back up and repeat.
Using a Stand Mixer
If you prefer using a stand mixer, combine the ingredients in the mixer bowl and use the dough hook attachment. Mix on low speed until the dough comes together, then increase the speed to medium and knead for about 5-7 minutes, until the dough is smooth and elastic.

First Rise: Timing and Temperature
The first rise is a critical step in the bun-making process. Place the dough in a lightly oiled bowl, cover it with plastic wrap or a damp cloth, and let it rise in a warm, draft-free place. The ideal temperature for the first rise is between 75°F to 80°F (24°C to 27°C). Let it rise for about 1-2 hours, or until it has doubled in size.
| Temperature (°F) | Rise Time (hours) |
|---|---|
| 75 | 1.5 |
| 80 | 1 |
Shaping Your Buns
Once the dough has risen, punch it down to release any air bubbles. Divide the dough into equal portions, shape each portion into a ball, and then flatten it slightly into a bun shape. Place the shaped buns onto a baking sheet lined with parchment paper, leaving enough space between them for even rising.
By following these steps, you’ll be able to create delicious homemade buns that are perfect for any occasion. Whether you’re making burgers, sandwiches, or just enjoying them on their own, your basic buns recipe is sure to impress.
Perfecting the Baking Process
Achieving the perfect bake is crucial for making delicious homemade buns. The baking process is where your efforts in mixing and kneading the dough finally pay off, transforming your buns into golden-brown treats.
Second Rise: The Key to Fluffy Buns
The second rise, also known as the final proof, is essential for achieving fluffy buns. After shaping your buns, let them rise in a warm, draft-free place until they have doubled in size. This step can take anywhere from 30 minutes to an hour, depending on the temperature and the yeast’s activity.
Oven Temperature and Positioning
Preheating your oven to the correct temperature is vital. For most bun recipes, a temperature between 375°F to 400°F (190°C to 200°C) is ideal. Positioning your buns in the center of the oven ensures even baking. If you’re baking multiple trays, rotate them halfway through the baking time to prevent uneven browning.
Baking Time: Visual Cues for Doneness
Baking time can vary depending on the size of your buns and your oven’s performance. Generally, buns take between 12 to 20 minutes to bake. Check for doneness by looking for a golden-brown color on top and a hollow sound when tapping the bottom of a bun.
Cooling and Storing Your Buns
After baking, let your buns cool on a wire rack to prevent moisture from accumulating underneath. Once cooled, store them in an airtight container to keep them fresh. You can also freeze your buns for longer storage; simply thaw and refresh in the oven when needed.
| Bun Type | Baking Temperature | Baking Time |
|---|---|---|
| Small Buns | 375°F (190°C) | 12-15 minutes |
| Large Buns | 400°F (200°C) | 18-20 minutes |
Troubleshooting Common Bun-Making Problems
Despite having the perfect recipe and tools, bun-making can still hit a snag. Don’t worry, we’ve got you covered. In this section, we’ll tackle common issues that might arise during the bun-making process, providing you with practical solutions to get back on track.
Dough Not Rising Properly
If your dough isn’t rising as expected, there are several potential causes to investigate. First, check the yeast expiration date and ensure it was stored correctly. The temperature of your environment is also crucial; yeast thrives in warm, draft-free areas. If your dough is too cold, the yeast won’t activate properly. Lastly, verify that you haven’t added too much salt, as excessive salt can inhibit yeast activity.
Buns Too Dense or Too Dry
Dense or dry buns can be disappointing. To avoid this, ensure you’re measuring ingredients accurately. Overmixing the dough can also lead to dense buns, so mix your ingredients just until they come together. Additionally, be mindful of your proofing time; overproofing can cause buns to become dense. For dry buns, check your oven temperature and baking time, as overbaking is a common culprit.
Uneven Baking or Browning
Uneven baking or browning can be frustrating. To achieve uniform results, make sure your oven is preheated correctly and that you’re using the correct oven rack positioning. If you’re baking multiple trays at once, rotate them halfway through the baking time to ensure even browning. Also, consider using a baking stone to promote consistent heat distribution.
Fixing Flavor Issues
If your buns lack flavor, it might be due to insufficient salt or sugar. Check your recipe and ensure you’re using the right amount. You can also experiment with adding flavor enhancers like herbs, spices, or nuts to give your buns a boost. Additionally, consider the quality of your ingredients; using fresh, high-quality components can significantly impact the final flavor.
Delicious Variations of the Basic Buns Recipe
The basic buns recipe is just the starting point – let’s dive into some tasty variations. Once you’ve mastered the fundamental recipe, you can start experimenting with different ingredients to create unique and mouth-watering buns.
Sweet Bun Variations
Sweet buns are a delightful twist on the classic recipe. You can create a variety of sweet treats by incorporating different ingredients.
Cinnamon Sugar Buns
Add a sweet and sticky flavor to your buns by sprinkling cinnamon sugar on top before baking. This classic combination is sure to be a hit.
Fruit-Filled Options
Introduce a fruity twist by filling your buns with jam, raisins, or dried cranberries. These sweet surprises will add a new dimension to your buns.
Savory Bun Options
Savory buns are perfect for sandwiches, burgers, or as a side to your favorite soups. Experiment with different herbs and spices to create unique flavor profiles.
Herb and Garlic Buns
Mix minced garlic and chopped herbs like rosemary or thyme into the dough for a savory and aromatic bun.
Cheese-Topped Varieties
Sprinkle grated cheese on top of your buns before baking for an extra burst of flavor. You can use different types of cheese, such as cheddar, parmesan, or mozzarella.
Whole Grain and Healthier Alternatives
For a healthier option, consider substituting some or all of the all-purpose flour with whole wheat or other whole grains. You can also experiment with alternative flours like almond or oat flour.
- Whole wheat flour adds a nuttier flavor and denser texture.
- Oat flour provides a slightly sweet and earthy taste.
- Almond flour creates a delicate and crumbly texture.
By incorporating these variations into your baking routine, you’ll be able to create a wide range of delicious buns that cater to different tastes and dietary preferences.
Serving Suggestions and Pairings
With your basic buns recipe mastered, it’s time to explore the endless possibilities of serving and pairing. Homemade buns can elevate a simple meal into something special, whether you’re making burgers, sandwiches, or breakfast treats.

Perfect Burger and Sandwich Combinations
Homemade buns make all the difference in burgers and sandwiches. For a classic burger, try pairing your buns with freshly ground beef, crisp lettuce, juicy tomatoes, and your favorite cheese. For a gourmet twist, consider fillings like grilled chicken with avocado or pulled pork with barbecue sauce.
| Bun Type | Recommended Filling | Additional Toppings |
|---|---|---|
| Brioche Bun | Grilled Chicken | Avocado, Bacon |
| Whole Wheat Bun | Turkey Breast | Lettuce, Tomato, Mustard |
| Sweet Bun | Pulled Pork | Barbecue Sauce, Coleslaw |
Accompaniments for Breakfast Buns
Breakfast buns can be a delightful treat when paired with the right accompaniments. Serve them with scrambled eggs, crispy bacon, or sausage for a hearty breakfast. For a sweeter option, try filling your buns with cream cheese and fresh fruit.
Creative Ways to Use Leftover Buns
Don’t let leftover buns go to waste. You can use them to make French toast, bread pudding, or even croutons for salads. Simply slice the buns, cube them, and bake until crispy for a delicious topping.
By exploring these serving suggestions and pairings, you’ll find that your homemade buns can become a staple in your kitchen, suitable for any meal or snack.
Conclusion: Enjoying Your Homemade Bun Journey
Now that you’ve completed your first batch of homemade buns, it’s time to savor the fruits of your labor. Your homemade bun journey is just beginning, and the possibilities are endless. Whether you’re a seasoned baker or just starting out, we’ve provided you with a comprehensive guide to making perfect buns every time.
As you continue on your baking journey, remember that practice makes perfect. Don’t be discouraged if your first buns aren’t flawless – it’s all part of the process. Experiment with different flavors, ingredients, and techniques to find what works best for you. With time, you’ll develop your own signature bun recipes and become the go-to baker among your friends and family.
In this conclusion to our basic buns recipe guide, we encourage you to keep exploring and enjoying the world of homemade buns. Share your creations with loved ones, and don’t be afraid to try new things. Your homemade bun journey is a path of discovery and delight, and we’re excited to see where it takes you.