There’s something about autumn that just makes you want to curl up and enjoy something cozy and comforting.
This recipe takes that feeling and turns it into a delicious twist on a classic dessert.
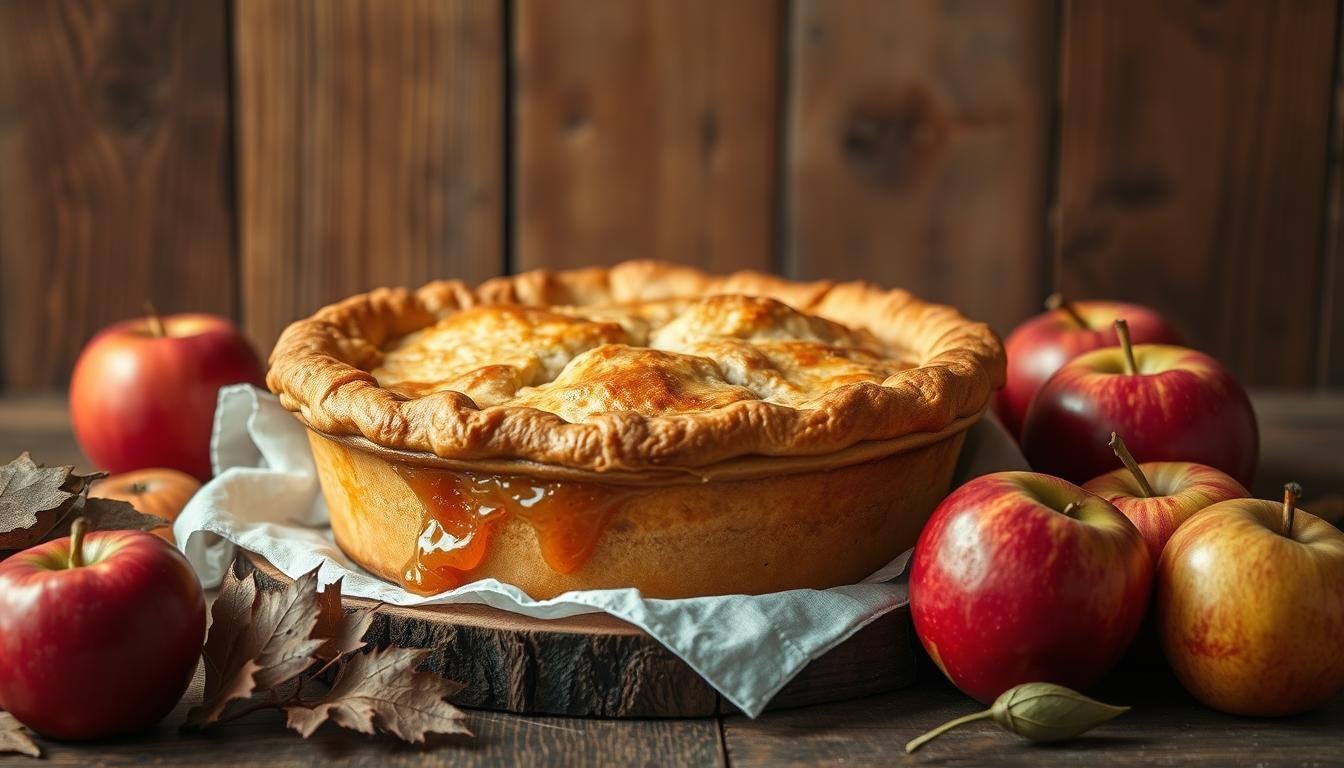
Imagine a flaky, homemade crust wrapped around a rich, velvety filling bursting with the flavors of fall.
The secret? Caramelized apple butter that adds a deep, sweet warmth you can taste in every bite. It’s easy to make, so you spend less time fussing in the kitchen and more time savoring those first delightful slices with loved ones—perfect for chilly evenings, holiday gatherings, or simply a quiet moment by the fire.
Table of Contents
Key Takeaways
- Elevates classic desserts with intense, caramelized flavors
- Simplifies preparation while delivering professional-quality results
- Features a unique texture that blends silky custard with flaky crust
- Ideal for autumn celebrations and holiday menus
- Offers a creative alternative to pumpkin-based seasonal treats
Introduction to Apple Butter Apple Pie
Autumn’s arrival brings a shift in dessert cravings, steering us toward deeper, richer flavors. Enter a creation that marries velvety textures with the warmth of spiced fruit—a pie where every forkful feels like a cozy embrace. By swapping traditional fillings for slow-simmered apple butter, this recipe delivers complexity in every bite without demanding hours in the kitchen.
Why This Recipe Captures the Essence of Fall
Think of caramelized orchard fruits reduced to their most intense form. That’s the power of apple butter, which concentrates flavors through hours of gentle cooking. When baked into a pie, it creates a filling reminiscent of pumpkin’s smoothness but with distinct orchard notes. Cinnamon and brown sugar amplify the natural sweetness, mirroring the season’s spice-forward profile.
A Unique Twist on a Classic Dessert
Forget wrestling with peelers or worrying about uneven slices. This recipe skips the chunks, offering a custard-like consistency that sets this pie apart. The crust remains flaky, contrasting beautifully with the silky center. Each slice delivers pure flavor—honoring tradition while embracing modern simplicity.
The Story Behind This Fall Favorite

What if the secret to a modern dessert was hidden in age-old traditions? This recipe didn’t emerge from trendy bakeries—it evolved through generations of home cooks reimagining pantry staples. During autumn harvests, families preserved orchard fruits by simmering them into thick spreads, unknowingly laying the groundwork for a culinary breakthrough.
From Traditional Apple Pie to a New Seasonal Sensation
Early versions of apple pie relied on sliced fruit, but resourceful bakers noticed something revolutionary. The smooth texture of homemade preserves mirrored pumpkin puree—a key ingredient in custard-style pies. By swapping one for the other, they created a rich, velvety filling that required no peeling or coring.
Regions with abundant orchards particularly embraced this method. Surplus yields meant gallons of apple butter needed creative uses. This practical solution birthed a dessert balancing rustic charm with refined elegance—a far cry from chunky, time-consuming classics.
As pumpkin-based treats dominated fall menus, this recipe offered a fresh take. Its popularity surged among those seeking bold fruit flavors without sacrificing simplicity. Today, it stands as proof that innovation often springs from necessity—and a well-stocked pantry.
Essential Ingredients for a Perfect Apple Butter Apple Pie
The secret to an unforgettable dessert lies in its components. Every element must harmonize, from the velvety base to the spices that dance on your tongue. Let’s explore what transforms ordinary pantry staples into a showstopping autumn creation.

High-Quality Apple Butter and Fresh Apples
Your pie’s success starts with apple butter that’s thick and richly spiced. Thin varieties make fillings runny, while concentrated versions create a custard-like texture. Homemade batches let you control sweetness, but store-bought options work if they contain at least 70% fruit.
Pair it with fresh, tart apples like Granny Smith for balance. Their bright acidity cuts through the caramelized depth of the butter. Room-temperature eggs bind everything smoothly, while a mix of granulated and brown sugar adds complexity without overpowering.
Choosing the Ideal Spices and Sweeteners
Ground cinnamon is non-negotiable—it’s the warm hug your recipe needs. For depth, add a pinch of nutmeg or ginger. Sweetened condensed milk delivers luxurious richness, but whole milk keeps things lighter. Cornstarch ensures clean slices, acting as your texture insurance policy.
Remember: quality beats quantity. Premium ingredients mean you’ll taste every nuance, from the first forkful to the last crumb.
Crafting Your Flaky Pie Crust
A great pie starts with its foundation—the crust. While fillings steal attention, the base determines whether your creation shines or crumbles. Achieving that perfect balance of tenderness and structure requires understanding two paths: homemade mastery or store-bought convenience.

Homemade Versus Store-Bought: What Works Best
Handmade dough gives unmatched control. Start with 2½-3¼ cups all-purpose flour and 20 tablespoons chilled cubed butter. Cut the fat into pea-sized pieces using a pastry blender—this creates steam pockets during baking for maximum flakiness. Gradually add ¼-⅔ cup ice water until the dough just holds together.
Chill the mixture for at least 60 minutes before rolling to ⅛-inch thickness. This prevents shrinkage and ensures even baking. While time-intensive, this method delivers a texture that crackles under forks.
| Factor | Homemade | Store-Bought |
|---|---|---|
| Prep Time | 25 minutes + chilling | 5 minutes |
| Texture | Layered, crisp flakes | Uniform, less flaky |
| Customization | Adjust butter ratio | Fixed ingredients |
| Convenience | Requires skill | Ready-to-use |
Pre-made crusts save 40+ minutes but often lack flavor depth. Choose unbaked versions with real butter if opting for convenience. Either way, keep ingredients cold—warm hands melt fat layers crucial for that signature crunch.
Your recipe success hinges on this choice. Homemade rewards patience with artisanal results, while store-bought lets you focus on filling perfection. Both paths lead to memorable desserts when executed thoughtfully.
Mastering the Custard-Like Apple Butter Filling
Creating a flawless custard-like center requires precision and smart technique. Unlike traditional fruit-packed versions, this filling achieves its velvety texture through careful ingredient harmony. Let’s break down the methods that transform simple components into a silky masterpiece.

Techniques for a Smooth, Set Filling
Start with room-temperature apple butter—cold ingredients cause lumps. Whisk it vigorously for 90 seconds until glossy. Add eggs one at a time, blending fully after each. This prevents separation and ensures even distribution.
Combine dry ingredients first: ¼ cup cornstarch, ½ cup brown sugar, and 1 tsp cinnamon. Sift them directly into the wet mixture. Use a figure-eight motion to incorporate everything in under 2 minutes—overmixing leads to dense textures.
Balancing Sweet Brown Sugar and Cinnamon Notes
Brown sugar’s molasses depth can overpower if unchecked. Limit it to ⅓ cup and pair with ¼ cup granulated sugar. Add cinnamon gradually—taste after each ½ teaspoon. The goal? Warmth without bitterness.
For extra richness, swap milk for cream in the final mix. Pour the filling into your pre-baked crust within 5 minutes to maintain ideal consistency. Bake immediately to lock in that luxurious, sliceable texture.
Apple Butter Apple Pie: The Ultimate Fall Recipe

When autumn’s chill fills the air, your oven becomes a portal to flavor perfection. This recipe elevates seasonal baking by blending heritage methods with modern efficiency. Unlike traditional versions, it uses concentrated fruit spread to create depth that fresh slices can’t match.
Farmers’ markets overflow with artisanal apple butter during peak harvest months. Its caramelized richness cuts prep time in half while amplifying spice notes. You’ll achieve bakery-quality texture without special tools—just a bowl, whisk, and trusty pie dish.
The magic lies in balancing simplicity and sophistication. One bite reveals cinnamon warmth layered over velvety custard, all cradled by a crisp shell. It’s designed for fall gatherings where you want applause without spending hours in the kitchen.
Set your oven to 375°F, and within 90 minutes, you’ll have a golden masterpiece. Serve it slightly warm with a dollop of whipped cream. Guests will swear you trained under pastry chefs—yet the recipe demands nothing more than thoughtful ingredient choices and precise timing.
This creation proves that baking brilliance doesn’t require complexity. It’s the ultimate celebration of autumn’s bounty—a dessert where every element sings in harmony.
Expert Baking Techniques and Tips
Precision separates good results from exceptional ones in pastry creation. Mastering these methods ensures your dessert maintains structural integrity while achieving ideal texture contrasts.
Pre-Baking and Pie Weights for a Perfect Crust
Begin by chilling your crust for 30 minutes before baking. Line it with parchment paper, then fill with ceramic weights or dried beans. This prevents air pockets and shrinkage during the initial 15 minutes at 375°F.
Remove weights after partial baking. Return the crust to the oven for 5 additional minutes to dry the surface. This creates a barrier against soggy bottoms when adding fillings later.
Optimal Baking Temperature and Timing
Most recipes thrive at 375°F for 60-65 minutes. For delicate fillings, try a two-zone approach:
| Method | Temperature | Duration | Rack Position |
|---|---|---|---|
| Standard | 375°F | 60-65 min | Center |
| Two-Zone | 325°F | 30 min + 15 min | Center ➔ Bottom |
Monitor edges after 40 minutes. If browning too fast, wrap them in foil. The filling should jiggle slightly when shaken—it firms during cooling. Use an oven thermometer to verify accuracy, as dials often misreport actual temperature.
Creative Serving Suggestions and Toppings
The final flourish transforms your dessert from satisfying to spectacular. Thoughtful pairings highlight the custard-like texture while adding visual drama to each plate.
Whipped Cream, Ice Cream & Flavorful Drizzles
Whip 1 cup heavy cream with powdered sugar, cinnamon, and vanilla for a cloud-like topping. The spice echoes the filling’s warmth without overpowering it. Serve warm slices with cold vanilla ice cream—the temperature contrast delights the palate.
Drizzle extra apple butter on top for glossy ribbons of flavor. Swirl it into whipped cream for marbled elegance. For tangy balance, try crème fraîche or high-quality sour cream. These alternatives cut through the sweetness, creating harmonious bites.
Present your creation on chilled plates to maintain textures. Garnish with edible flowers or cinnamon sticks for Instagram-worthy appeal. Every detail elevates the experience, turning dessert into a multisensory celebration.
FAQ
Can I substitute store-bought crust if I’m short on time?
Yes, pre-made options work, but homemade dough offers better texture and flavor control. Chill it thoroughly before rolling to prevent shrinkage during baking.
How do I prevent the filling from becoming too runny?
Toss sliced fruit with cornstarch or flour before mixing with spices and sweeteners. Let the mixture sit for 10 minutes to thicken before adding to the shell.
What’s the best way to avoid a soggy bottom crust?
Pre-bake the shell with weights at 375°F for 15 minutes. Brush the base with egg wash afterward to create a moisture barrier before adding the custard-like mixture.
Can I use pumpkin butter instead for a seasonal variation?
Absolutely! Pumpkin butter adds a warm, earthy flavor. Adjust spices like nutmeg or cloves to complement the swap, and reduce added sugars if the blend is already sweetened.
How long does this dessert stay fresh after baking?
Store it covered at room temperature for up to two days or refrigerate for five days. Reheat slices briefly in the oven or toaster to revive the flaky layers.
Do I need special tools for lattice crust designs?
A sharp knife or pastry wheel works, but chilled dough is key. Freeze strips for 10 minutes before weaving to maintain clean edges and prevent stretching.